
Setting up a landscape lighting timer transforms an outdoor space from something requiring nightly manual switches into a hands-off system that handles itself. Whether someone’s juggling work late or away on vacation, a properly configured timer keeps the yard lit on schedule without any guesswork. The good news? It’s one of the most approachable outdoor electrical upgrades a homeowner can tackle. This guide walks through the options, setup process, and fixes for when things don’t behave as expected, no electrician license required for basic plug-in and WiFi models.
Key Takeaways
- A landscape lighting timer automates outdoor lights on a preset schedule, eliminating manual switches and reducing energy waste by up to two-thirds compared to lights running 24 hours daily.
- Plug-in mechanical timers ($10–$25) offer the simplest setup requiring zero wiring, while digital plug-in timers ($30–$60) provide minute-level precision and customizable weekday/weekend schedules.
- Smart WiFi-enabled timers ($50–$150) allow smartphone control and advanced features like geofencing, but require WiFi connectivity and hardwired models typically need professional electrical installation.
- Most landscape lighting timer setup takes under an hour with basic plug-in models: simply set the current time, configure on/off pins or digital times, and switch to Auto mode.
- Mechanical timers require manual adjustment during Daylight Saving Time, while most digital and smart timers adjust automatically if connected to the internet.
- Always use GFCI outlets for outdoor timers to prevent electrical shocks and fires, and house timers in weatherproof covers to protect from moisture and sunlight.
Understanding Landscape Lighting Timers and Their Benefits
A landscape lighting timer is a simple control device that switches outdoor lights on and off at preset times, eliminating the need for manual operation. Most homeowners install them for convenience, no more remembering to flip a switch at dusk or leaving lights running all night. Beyond convenience, timers cut energy waste. A light left on 24 hours uses triple the electricity of one running 8 hours per day, which adds up across multiple fixtures. They also improve security by making a home appear occupied when no one’s there, and they extend bulb lifespan by reducing unnecessary runtime. Timers come in mechanical and digital varieties, each with different features and price points suited to different needs.
Types of Landscape Lighting Timers
Plug-In Timers
Plug-in timers are the easiest entry point and require zero wiring. These sit between an outlet and a light fixture cord, standard outlet timers work for this, though outdoor-rated models handle moisture better. Mechanical dial timers use a rotating wheel with hour markers and small pins or tabs: pull the pin up for hours when lights should run, push it down for off hours. They’re inexpensive ($10–$25) and need no batteries, but they’re less precise, usually accurate only to the nearest 15 minutes. Digital plug-in timers offer minute-level precision, customizable weekday/weekend schedules, and battery backup for power outages. Expect to spend $30–$60 for a reliable outdoor-rated digital model. One downside: if the power cord gets unplugged, mechanical timers reset entirely, so placement near foot traffic should be avoided.
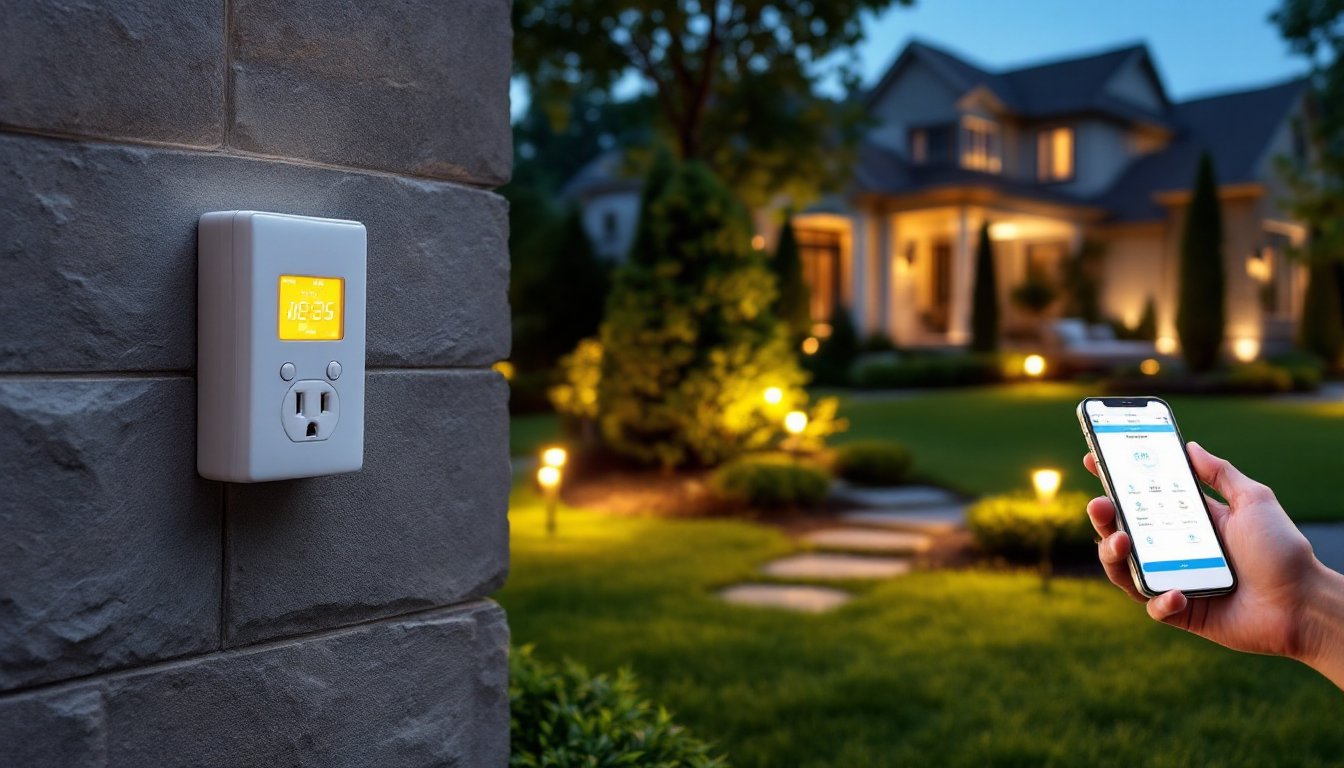
Smart WiFi-Enabled Timers
WiFi-enabled timers connect to home networks and let homeowners control lights from a smartphone app, anywhere with internet. These typically mount in place of a traditional outlet switch (hardwired installation) or sit as smart plug-in adapters. Installation of hardwired models requires turning off power at the breaker and replacing the existing switch, a job that falls into “hire an electrician” territory if unfamiliar with electrical work. Smart plug-in options sidestep that: they plug directly into an outlet, and pairing to WiFi takes minutes through an app. Features include geofencing (lights activate when approaching home), integration with voice assistants, and detailed usage reports. Cost runs $50–$150 depending on brand and capability. The tradeoff: they need WiFi coverage, rely on cloud connectivity, and require a smartphone to manage. A power outage can disrupt automation until the internet reconnects.
Step-by-Step Setup Instructions for Your Timer
For Plug-In Mechanical Timers:
- Unplug the landscape light fixture from the wall outlet (or switch off power if hardwired).
- Plug the timer into the outlet.
- Plug the light fixture cord into the timer’s outlet.
- Turn the dial to the current time by rotating it until the indicator line aligns with the present hour.
- Push down all the small pins or tabs on the dial corresponding to hours when lights should be off.
- Pull up the pins for hours when lights should be on. For example, if dusk is 6 PM and dawn is 7 AM, pull pins from 6 PM to 7 AM and push the rest down.
- Switch the mode lever to “Auto” or “Timer” (varies by model).
- The light should now turn on and off automatically at the set times.
For Digital Plug-In Timers:
- Plug the timer into an outdoor outlet: a GFCI outlet is safest for outdoor use.
- Plug the landscape light fixture into the timer’s output.
- Press the “Set” or “Program” button and follow the on-screen prompts to enter the current time.
- Use the +/− buttons to set the on time (typically sunset) and off time (typically sunrise).
- If the timer offers daily or weekly programming, select those options and input a schedule (some allow different times for weekdays and weekends).
- Confirm the settings are saved (look for a “Done” or “Confirm” button).
- Switch to “Auto” mode. The light will activate at the programmed on time.
For Smart WiFi Timers (Plug-In):
- Plug the smart adapter into a GFCI outdoor outlet.
- Download the manufacturer’s app to a smartphone.
- Follow the in-app pairing process: usually the app scans for nearby devices or displays a QR code to scan.
- Select the home WiFi network and enter the password.
- Once connected, open the app and navigate to scheduling or automation settings.
- Input desired on and off times, or enable features like geofencing or sunset-based triggers (if supported).
- Test the schedule by manually toggling the light on and off in the app.
General Tips:
Daylight Saving Time shifts schedules on mechanical timers, many digital and smart models adjust automatically. Check the manual to see if manual adjustment is needed in March and November. Install timers in a weatherproof box or outlet cover to shield them from rain and direct sun. Always use a GFCI outlet for outdoor timers: it cuts power if it detects a short circuit, preventing shocks and fires.
Troubleshooting Common Timer Issues
Lights Won’t Turn On at Scheduled Time
First, confirm the current time is correct. On mechanical timers, recheck that the dial’s indicator aligns with the actual hour. On digital models, verify the on time is set correctly and that the mode is in “Auto,” not “Manual Off.” Inspect the power cord for damage and ensure the outlet has power by plugging in another device (a lamp or phone charger). If the outlet is dead, check the home’s circuit breaker, a tripped breaker cuts power to the outlet. A malfunctioning GFCI outlet also cuts power as a safety feature if it detects a fault: test it by pressing the “Reset” button.
Lights Stay On Constantly
This usually means the mode switch is set to “On” instead of “Timer.” Flip it to the correct mode. On digital timers, ensure the off time is set and that the schedule isn’t disabled. Mechanical timers sometimes fail if the dial is moved while powered on: unplug it, reset the time, and reseat the on/off pins firmly.
Smart Timer Won’t Connect to WiFi
Confirm the WiFi network is broadcasting and the password is correct. Some older routers use 5 GHz bands only: smart outdoor devices often need 2.4 GHz. Check the app settings or router admin panel to confirm 2.4 GHz is enabled. If the adapter is too far from the router, signal may be too weak, consider a WiFi extender or moving the router closer. Restart the adapter by unplugging it for 30 seconds, then retry pairing.
Daylight Saving Time Adjustments
Mechanical timers don’t adjust automatically, manually rotate the dial forward one hour in spring and back one hour in fall. Most digital and WiFi timers update themselves if they’re connected to the internet, but verify this in the app or manual.
Conclusion
Setting up a landscape lighting timer is a straightforward project that pays dividends in convenience, energy savings, and peace of mind. Whether opting for a budget-friendly mechanical timer or a smart WiFi-enabled system, the setup takes under an hour and requires no special tools or permits. Start simple with a plug-in model, test the schedule over a few days, and upgrade to a smarter system later if needed. The key is matching the timer type to the actual use case, casual homeowners benefit from basic mechanical or digital timers, while those who want remote control or advanced scheduling should invest in WiFi models. Either way, landscape lighting automation removes one more task from the to-do list.