
Outdoor flush mount lighting sits right at the intersection of function and curb appeal, the kind of project that pays for itself through better security and nighttime visibility, then keeps paying dividends by making your home’s exterior look intentional rather than an afterthought. Unlike hanging pendants or sprawling landscape lights, flush mount fixtures mount directly to walls or ceilings and tuck in tight, delivering reliable illumination without the headaches of swinging chains or ground-stake upkeep. Whether someone’s upgrading a dated entry, lighting a covered porch, or replacing builder-grade fixtures with something with real character, outdoor flush mount lighting offers a straightforward path to professional-looking results on a DIY budget. This guide walks through fixture types, material durability, installation realities, and the thinking behind choosing the right lights for the job.
Key Takeaways
- Outdoor flush mount lighting reduces energy consumption by 75-80% compared to incandescent bulbs and lasts 25,000 to 50,000 hours, cutting maintenance costs dramatically over time.
- LED integrated fixtures eliminate the need for bulb replacement and resist moisture damage better than traditional swappable-bulb designs, making them ideal for humid or coastal climates.
- Flush mount fixtures come in diverse styles—from drum and cylinder designs to lantern and dome shapes—allowing homeowners to refresh curb appeal without rewiring existing electrical infrastructure.
- Proper installation requires a secure, outdoor-rated electrical box, weatherproof conduit for all exterior wiring, and appropriate IP-rated seals to prevent water damage and ensure safety.
- Anodized aluminum and powder-coated steel offer the best durability and corrosion resistance, while integrated LED ceiling panels provide modern, shadowless lighting for contemporary homes.
- Positioning fixtures 7-8 feet above entry walkways ensures even illumination and eliminates shadows, while motion sensors on security fixtures further reduce energy consumption and enhance deterrence.
What Is Outdoor Flush Mount Lighting?
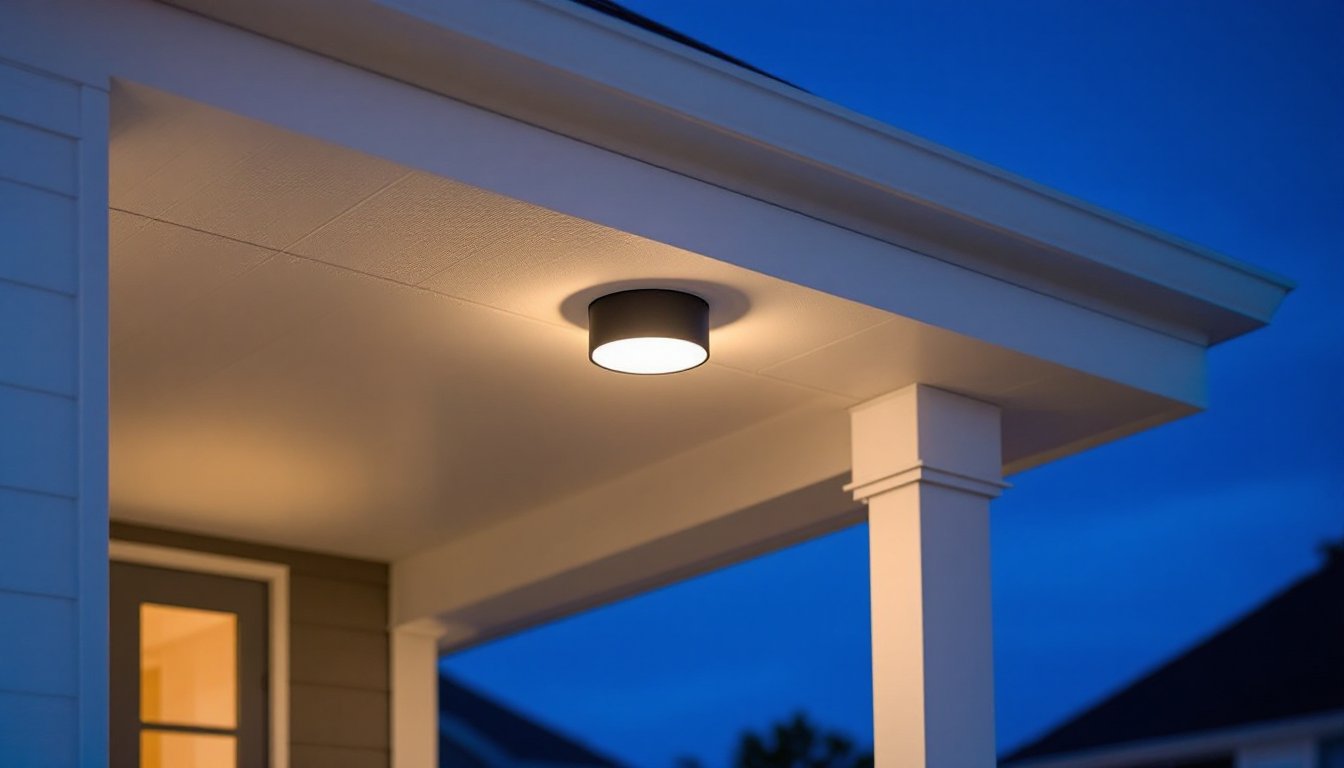
A flush mount fixture is any light that mounts directly flush against a wall or ceiling with no gap between the fixture and the mounting surface. Outdoor versions are sealed and rated for weather exposure, rain, UV, temperature swings, and salt air if you’re coastal. Unlike a recessed light (which sits inside a ceiling cavity) or a pendant (which hangs down on a chain or stem), a flush mount takes up almost no vertical space, making it ideal for low ceilings, tight soffits, or any spot where a hanging fixture would feel cramped.
These fixtures come pre-wired at the factory: installation typically means cutting a hole for the electrical box, running wiring through it, screwing the bracket to the box, and fastening the trim ring and diffuser. The design is straightforward enough for a confident DIYer with basic electrical knowledge, though some finicky drywall repair or soffit work might be involved depending on the mounting surface.
Most outdoor flush mounts use either an incandescent, CFL, LED, or integrated LED bulb. Modern designs favor integrated LED fixtures, sealed units with the LEDs built in, because they eliminate bulb-replacement headaches and perform better in humidity and temperature extremes. That said, swappable-bulb options remain common and useful if someone wants to adjust color temperature or brightness later without replacing the entire fixture.
Key Benefits for Your Home’s Exterior
Energy Efficiency and Long-Term Savings
LED flush mount fixtures consume 75–80% less energy than incandescent equivalents and last 25,000 to 50,000 hours compared to an incandescent bulb’s 1,000-hour lifespan. In practical terms, someone might replace an old porch light once a month in summer: an LED fixture might not need bulb or component replacement for five years. Over a season of nightly use, say 8 hours per day across a typical porch light, that energy difference adds up fast. A 60-watt incandescent fixture costs roughly $3–4 per month to run: a 9-watt LED equivalent costs about 40 cents. On a home with multiple fixtures, the cumulative savings fund the upgrade cost within a year or two.
Integrated LEDs also sidestep the common failure mode of swappable bulbs: moisture seeping into the base and causing corrosion or burnout. A sealed LED fixture rated IP65 or higher keeps water out, extending the serviceable life well beyond what a traditional fixture can manage in a damp climate.
Design Versatility and Aesthetic Appeal
Flush mount fixtures come in a staggering range of sizes, profiles, and finishes, from minimalist modern discs to transitional drum shapes, from rustic lantern-style designs to contemporary geometric forms. A nautical brass flush mount reads entirely differently from a sleek matte-black aluminum cylinder, yet both mount the same way and draw from the same electrical supply. This means someone can refresh their home’s look without rewiring, and they can swap fixtures seasonally or match a whole-home aesthetic update (exterior trim color, door hardware, mailbox style) with coordinated lighting.
Flush mounts also provide practical light distribution. A diffuser, the translucent or frosted panel at the bottom of the fixture, spreads light downward and to the sides, washing an entry or soffit evenly. This eliminates the harsh shadows and glare that hanging pendants sometimes create, and it doesn’t attract insects as aggressively as bare bulbs do.
Types of Outdoor Flush Mount Fixtures
Drum and cylinder fixtures are the workhorses: a cylindrical body with a diffuser that points down. They work on soffits, under eaves, and on porch ceilings, and they’re available in 8- to 16-inch diameters. Simple, clean lines, and cheap to replace if needed.
Lantern-style flush mounts mimic the look of traditional coach lights but mount flush to the wall or ceiling. These suit cottage, traditional, or transitional homes and often come in 8- to 12-inch widths. They cast light in multiple directions, which is great for entries but sometimes wastes light in shadow zones.
Dome and bell fixtures have a curved bottom that concentrates light downward, ideal for task lighting over an entry or work area. A 12-inch dome fixture over a front door provides focused, welcoming illumination without spilling light everywhere.
Flush mount chandeliers or multi-light fixtures mount directly to the wall or ceiling (not hanging) and include multiple bulb sockets, useful for bright, decorative outdoor spaces like covered patios. These typically require dedicated 20-amp circuits and slightly more complex wiring than single-socket fixtures.
Integrated LED ceiling panels are newer, flat, edge-lit designs that blur the line between flush mount and recessed. They look almost flush with the ceiling surface and provide shadowless, even light. They’re pricier but require no bulb replacement ever and work exceptionally well under modern, minimalist designs.
Materials and Durability Considerations
Aluminum and steel dominate outdoor fixtures for good reason: lightweight, corrosion-resistant (especially anodized or powder-coated aluminum), and affordable. Anodized aluminum resists salt spray and UV degradation. Powder-coated steel looks sleek but can chip: check for a rust-preventive primer underneath the finish.
Brass and copper age beautifully, patina is part of the aesthetic, but require occasional polishing to prevent tarnish buildup. If someone wants that aged look without maintenance, go for “weathered brass” or powder-coated finishes that mimic the aged appearance without the upkeep. Real brass oxidizes and requires lacquer or wax to slow the process.
Cast aluminum is heavier and more durable than stamped aluminum, resisting dents and warping. It’s common in mid-to-premium fixtures.
Diffusers and lenses come in acrylic (durable, economical, yellows over time in intense UV), polycarbonate (more scratch-resistant than acrylic), and glass (expensive, excellent clarity, breaks if hit). For a coastal or harsh-climate home, polycarbonate or glass holds up better and looks better years later.
Sealing and gaskets: Check the fixture’s IP rating (Ingress Protection). IP54 means dust and splash protection: IP65 means dust-tight and low-pressure water jets: IP67 means brief immersion. For a soffit or covered porch, IP54 is adequate. For an exposed wall or under open sky, IP65 is safer. Fixtures should include neoprene or silicone gaskets around the base and around any bulb sockets to keep moisture out.
Always verify the fixture is UL or ETL certified for wet locations (if exposed to rain) or damp locations (if under a covered porch). This mark guarantees the electrical components and materials meet safety standards.
Installation and Placement Best Practices
Before buying or installing, confirm the existing electrical box is rated for outdoor use and securely anchored to a stud or joist. A loose box, or one designed for interior drywall only, is a safety hazard and won’t support a heavy fixture long-term. If the existing box isn’t solid, turn off the breaker, remove the old fixture, and install a UL-rated outdoor electrical box with a stud bracket or bar hanger rated for the fixture weight.
Preparation: Turn off the breaker and verify power is off with a non-contact voltage tester. Remove the old fixture. If installing in a new location, run 12-gauge wire (for 20-amp circuits) or 14-gauge (for 15-amp) through conduit, and install a weatherproof box at the endpoint. All exterior wiring should be in PVC or metal conduit, not buried in walls unprotected.
Mounting: Flush mount fixtures come with a mounting strap that screws to the electrical box. Hold the fixture body up, thread the wires through the center knockout, and connect the fixture’s ground (bare copper), neutral (white), and hot (black) wires to the corresponding house wires using waterproof wire nuts (outdoor-rated). Silicone or dielectric grease helps water-resistant connections. Secure the fixture body to the mounting strap, then install the trim ring and diffuser as specified in the instructions.
Placement: Mount fixtures 7–8 feet above walking surfaces on entries for even, shadowless light. On soffits, 12–18 feet up works well for broader illumination. Avoid pointing them directly at windows or reflective surfaces where they’ll create glare. Use motion-sensor or occupancy-sensor capabilities on fixtures near security areas to cut energy use and deter intrusion.
Bulb selection: If the fixture accepts swappable bulbs, choose 3000K color temperature (warm, welcoming) for entries and living spaces, 4000K (neutral) for task areas, and 5000K (cool, bright) for security lighting. For wet locations, insist on bulbs rated IP65 or higher, or go integrated LED and skip the bulb-selection guesswork altogether.
Permits: Confirm local codes. Adding a new outdoor circuit or relocating a fixture usually doesn’t require a permit, but new construction or major rewiring often does. Call the local building department, a quick call saves a costly inspection fail later.
Next Steps: Making Your Selection
Outdoor flush mount lighting is one of the highest-ROI upgrades a DIYer can tackle: lower energy costs, minimal maintenance with LEDs, and instant curb appeal. Start by assessing the existing fixture condition and wiring (safe and sound, or aging and risky?), then choose a style and material that match the home’s aesthetic and climate. Sealed, integrated-LED fixtures in anodized aluminum or powder-coated steel suit most climates and budgets. If that existing electrical infrastructure is questionable, corroded wiring, a loose box, or any sign of moisture damage, call a licensed electrician before installing anything: it’s not the place to improvise. Otherwise, a straightforward swap takes an afternoon and immediately lifts the entire exterior presence of the home.