
Crystal pendant lighting has become a cornerstone of modern kitchen design, and for good reason. These fixtures combine functional task lighting with visual sophistication, casting beautiful light patterns across a kitchen island while anchoring the entire room’s aesthetic. Whether you’re renovating a dated kitchen or building fresh, crystal pendants offer a timeless appeal that works with traditional, transitional, and even contemporary décor. Unlike trendy lighting choices that fade in and out of fashion, crystal pendants have remained desirable for decades, and the 2026 market offers more styles and price points than ever before. This guide covers everything a homeowner needs to know about selecting, sizing, and installing crystal pendant lighting for a kitchen island.
Key Takeaways
- Crystal pendant lighting combines functional task lighting with elegant aesthetics, making it the perfect focal point for kitchen island design across traditional, transitional, and contemporary styles.
- Proper sizing requires pendant diameter to be roughly one-third your island’s width, hung 30–36 inches above the countertop, with spacing based on island length (two pendants for 4-foot islands, three for 6-foot islands).
- Ensure adequate brightness by calculating 50–75 lumens per square foot for task lighting; a single 60-watt LED bulb produces 800–900 lumens, sufficient for smaller islands.
- Crystal’s refraction properties create beautiful light patterns and sparkle, while remaining durable and easy to clean with just a microfiber cloth—ideal for high-heat kitchen environments.
- Existing electrical infrastructure allows straightforward DIY installation, but running new wiring requires a licensed electrician and proper permits to ensure safety and compliance.
- Warm white light at 2700K is the most flattering color temperature for food prep areas, and pairing crystal pendants with dimmer switches provides flexibility between task and ambient lighting.
Why Crystal Pendants Are the Perfect Kitchen Island Solution
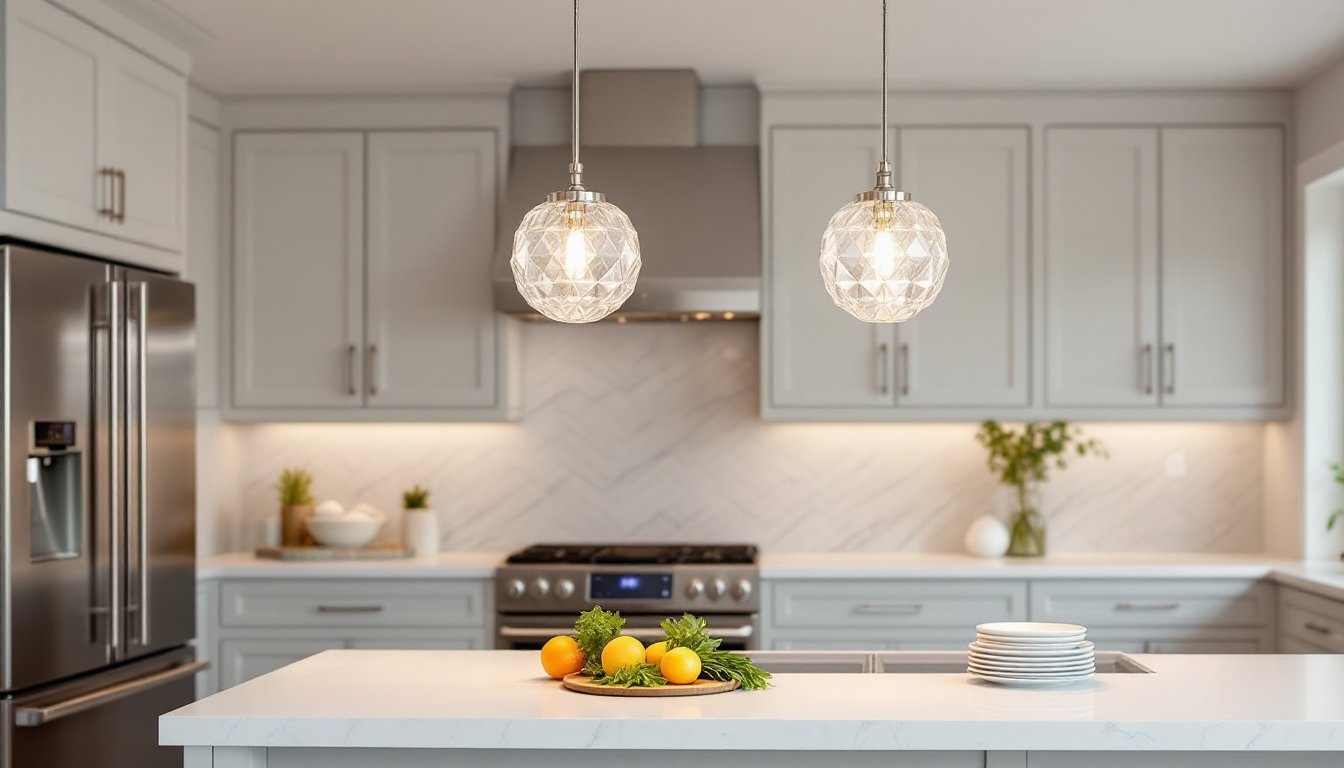
Crystal pendants serve a dual purpose: they deliver direct light where you need it most during meal prep and cooking, while also functioning as sculptural décor that draws the eye upward. A kitchen island is the natural focal point of most kitchens, and proper lighting here sets the tone for the entire space.
The refraction properties of crystal create subtle sparkle and depth that flat or frosted glass simply can’t match. When overhead kitchen lights hit a crystal pendant, the fixture becomes a small light show, a particularly appealing quality in evening hours when ambient lighting is low. This visual interest means your lighting fixture becomes a design statement rather than an afterthought.
Crystal also performs well in kitchens because the material is durable and easy to clean. Unlike fabric shades that collect grease and dust, crystal can be wiped down with a microfiber cloth, making maintenance straightforward in a high-heat, high-use environment. Also, crystal pendants come in sizes that work well over island surfaces (typically 10–15 inches in diameter), distributing light evenly without creating harsh shadows on food preparation surfaces.
Types of Crystal Pendant Fixtures to Consider
Crystal pendant styles range widely, and understanding the primary categories helps narrow your search without getting lost in endless options.
Traditional and Classic Designs
Traditional crystal pendants often draw inspiration from vintage chandeliers and feature ornate, faceted crystal elements, sometimes called pendalogue drops or crystal beads. These fixtures typically include brass, bronze, or polished nickel metalwork that complements the crystal. A classic drum shade wrapped in crystal strands creates a formal, elegant look suited to transitional and traditional kitchens.
Many traditional-style crystal pendants incorporate a cluster of smaller crystals or a single large faceted element, often paired with a warm-toned metal base. These designs work beautifully in kitchens with raised-panel cabinetry, wood tones, and traditional hardware finishes. Because they’re established classics, traditional crystal pendants are widely available across price ranges, from budget-friendly ($40–$80 per fixture) to luxury showroom pieces ($200–$500+ each).
Modern and Contemporary Styles
Contemporary crystal pendants strip away heavy ornamentation, focusing instead on clean geometry and minimalist crystal presentations. Think geometric crystal blocks, single large spheres of crystal, or linear crystal rods suspended within a sleek metal frame, often in brushed nickel, black, or chrome finishes. These designs complement modern kitchens with clean lines, flat-panel cabinetry, and stainless steel appliances.
Modern crystal pendants often feel lighter visually even though being sturdy, and they tend to cost similarly to traditional styles. The design difference comes down to aesthetic preference rather than structural difference. A contemporary crystal pendant might use the same quality crystal as a traditional piece but arrange it in a single, bold form rather than clustered ornaments.
Sizing, Placement, and Layout Best Practices
Getting the size and placement right is non-negotiable, wrong dimensions can make an island feel cramped or unbalanced.
Pendant diameter should be roughly one-third the width of your island. A 3-foot-wide island works well with 10–12 inch diameter pendants: a 4-foot island can handle 12–15 inch fixtures. Going too large visually overwhelms the space and creates shadows: too small and the pendants disappear into the background.
Hanging height matters for both function and safety. Hang pendants 30–36 inches above the island countertop surface, low enough to provide task lighting for food prep but high enough that you won’t bump your head walking past. If your kitchen has cathedral or vaulted ceilings, you may go slightly lower to maintain visual proportion, but never sacrifice headroom for aesthetics.
Spacing and quantity depend on island length. A 4-foot island works well with two pendants spaced evenly (roughly 18 inches from the island’s center in either direction). A 6-foot island typically needs three pendants, equally spaced. Uneven spacing looks haphazard: consistent placement feels intentional and balanced.
Consider your existing electrical layout. If your island already has a pendant light junction box wired from above, you’re set. If not, you’ll likely need to run new wiring through the ceiling or floor, which may require a licensed electrician and possibly a permit depending on your jurisdiction. Check local building codes before assuming you can DIY this portion.
Lighting Performance and Brightness Requirements
Crystal pendants are beautiful, but they must also perform the primary job: providing adequate light for cooking and food prep.
Task lighting for kitchens typically requires 50–75 lumens per square foot over work surfaces. An island measuring 4 feet by 2 feet is roughly 8 square feet, so you’d want 400–600 total lumens from your pendants. Check the specification sheet of any fixture you’re considering, reputable manufacturers list lumen output. A single 60-watt equivalent LED bulb produces roughly 800–900 lumens, so one well-placed pendant can cover a smaller island: larger islands may need two or three fixtures for adequate brightness.
Color temperature affects how food looks and how the space feels. Warm white light (2700K) is flattering and cozy, a popular choice for islands. Neutral white (4000K) is closer to daylight and works well in contemporary kitchens. Avoid cool white (5000K+) over food prep areas: it can make fresh ingredients look tired or spoiled.
If your kitchen ceiling is dark or heavily textured, expect less light bounce and higher brightness needs. Conversely, light-colored ceilings amplify the light you do have. Many homeowners pair crystal pendants with a dimmable smart bulb or dimmer switch, allowing flexibility between bright task lighting during cooking and softer ambient light during meals or entertaining.
Installation and Maintenance Tips
Installation complexity depends on whether you have existing electrical infrastructure at your island.
If wiring already exists, the job is straightforward: turn off power at the breaker, remove the old fixture, disconnect the old wires, connect the new fixture’s wires to the junction box using wire nuts (twist them clockwise until snug), secure the mounting bracket, and hang the pendant. Wear safety glasses to protect from falling debris. Take a photo of your old fixture’s wiring before disconnecting, it’s a lifesaver if you forget the connection order.
If you’re running new wiring, stop and call a licensed electrician. Running new electrical circuits from your main panel to your island isn’t a typical DIY task, and mistakes can cause fires or serious injury. This work typically requires permits and inspection, and skipping proper installation can void your homeowner’s insurance.
Maintenance is simple: Dust crystal monthly with a dry microfiber cloth. For deeper cleaning, use a soft cloth slightly dampened with a 50/50 mixture of white vinegar and distilled water, then dry immediately to prevent water spots. Never use harsh chemicals or abrasive materials, they cloud the crystal’s clarity. Replace bulbs as needed, checking the fixture’s maximum wattage rating (LED is almost always fine: confirm your fixture accepts LEDs if you’re upgrading from incandescent).
Stabilize pendant stems if you notice any wobble after installation. Tighten the mounting bracket and check that the canopy (the metal piece at the ceiling) is flush against the ceiling. Wobbling suggests either loose hardware or a misaligned junction box, both are quick fixes worth addressing before you finalize the installation.